
Инструкция и руководство на русском
115 страниц подробных инструкций и пользовательских руководств по эксплуатации
07:36
Выводим AUX на любой магнитоле. (Слушаем музыку с телефона или плеера)
03:55
Подключаем AUX к магнитоле JVC KD-G511
04:21
AUX магнитолы KD-G807
02:17
Как сделать АУКС и USB входы на любую магнитолу.
01:08
JVC kd-G701 JVc kd-G801
05:56
Автомагнитола JVC KD-G701
01:25
Автомагнитола JVC KD-G807
01:19
JVC KD G807 Автомобильная магнитола
INSTRUCTIONS ИНСТРУКЦИИ ПО ЭКСПЛУАТАЦИИ KD…
Kd-g807, Instructions, Инструкции по эксплуатации
- Изображение
- Текст
GET0200-001A
[EE]
INSTRUCTIONS
ИНСТРУКЦИИ ПО ЭКСПЛУАТАЦИИ
KD-G807
CD RECEIVER
РЕСИВЕР С ПРОИГРЫВАТЕЛЕМ КОМПАКТ-ДИСКОВ
ENGLISH
Р
УCCKИЙ
For installation and
connections, refer to the
separate manual.
Указания по установке и
выполнению
соединений приводятся
в отдельной
инструкции.
В соответствии с Законом Российской Федерации “О защите прав
потребителей” срок службы (годности) данного товара “по истечении
которого он может представлять опасность для жизни, здоровья
потребителя, причинять вред его имуществу или окружающей среде”
составляет семь (7) лет со дня производства. Этот срок является
временем, в течение которого потребитель данного товара может
безопасно им пользоваться при условии соблюдения инструкции по
эксплуатации данного товара, проводя необходимое обслуживание,
включающее замену расходных материалов и/или соответствующее
ремонтное обеспечение в специализированном сервисном центре.
Дополнительные косметические материалы к данному товару,
поставляемые вместе с ним, могут храниться в течение двух (2) лет со
дня его производства.
Срок службы (годности), кроме срока хранения дополнительных
косметических материалов, упомянутых в предыдущих двух пунктах, не
затрагивает никаких других прав потребителя, в частности, гарантийного
свидетельства JVC, которое он может получить в соответствии с законом
о правах потребителя или других законов, связанных с ним.
• This unit is equipped with the display demonstration. To cancel it, see page 8.
• Данное устройство имеет функцию демонстрации на экране дисплея. Порядок ее отмены
смотрите на странице 8.
KD-G807
SOUND
VOL
VOL
SOURCE
R
F
U
D
ATT
Cover001A_KD-G807[EE]f.p65
1/15/04, 2:05 PM
3
ENGLISH How to reset your unit Press the reset button onthe…
Страница 2
- Изображение
- Текст
2
ENGLISH
How to reset your unit
Press the reset button on
the control panel using a
ball-point pen or similar tool.
This will reset the built-in
microcomputer.
Note:
Your preset adjustments—such as preset channels or sound
adjustments—will also be erased.
How to use the MODE button
If you press MODE, the unit goes into functions mode, then the number buttons and
5/∞ buttons
work as different function buttons.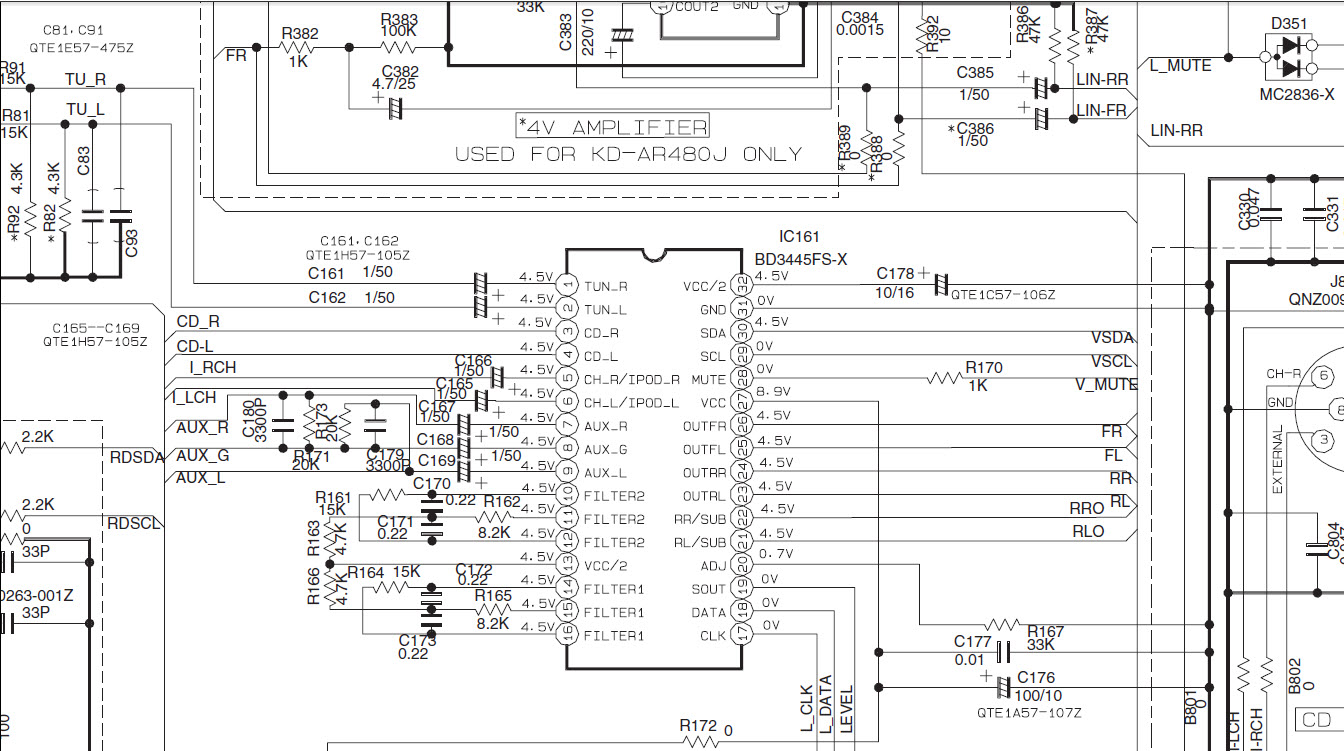
Ex.: When number button 2 works as MO (monaural) button.
To use these buttons for original functions again after pressing MODE, wait for 5 seconds
without pressing any of these buttons until the functions mode is cleared.
• Pressing MODE again also clears the functions mode.
Time countdown indicator
CAUTION:
NEVER insert your finger in
between the control panel and the
unit, as it may get caught or hurt.
(See page 40.)
IMPORTANT FOR LASER PRODUCTS
1. CLASS 1 LASER PRODUCT
2. CAUTION: Do not open the top cover. There are no user serviceable parts inside the unit; leave all
servicing to qualified service personnel.
3. CAUTION: Visible and invisible laser radiation when open and interlock failed or defeated. Avoid
direct exposure to beam.
4. REPRODUCTION OF LABEL: CAUTION LABEL, PLACED OUTSIDE THE UNIT.
EN02-03_KD-G807[EE]f.p65
1/15/04, 2:07 PM
2
ENGLISH Thank you for purchasing a JVC product.
 Please read…
Страница 3
- Изображение
- Текст
3
ENGLISH
Thank you for purchasing a JVC product. Please read all instructions carefully before operation,
to ensure your complete understanding and to obtain the best possible performance from the unit.
How to reset your unit ………………………….
2
How to use the MODE button ……………….
2
LOCATION OF THE BUTTONS …………
4
Control panel ………………………………………
4
Remote controller ………………………………..
5
Preparing the remote controller …………….
6
BASIC OPERATIONS …………………..
7
Turning on the power …………………………..
7
Canceling the display demonstration ……..
8
Setting the clock ………………………………….
9
RADIO OPERATIONS . ………………… 10
Listening to the radio …………………………… 10
Storing stations in memory ………………….. 11
Tuning in to a preset station …………………. 13
RDS OPERATIONS ……………………. 14
What you can do with RDS ………………….. 14
Other convenient RDS functions and
adjustments …………………………………….. 19
CD OPERATIONS ……………………… 21
Playing a CD ……………………………………… 21
Locating a track or a particular portion
on a CD ………………………………………….. 22
Selecting CD playback modes ……………… 23
Playing a CD Text ……………………………….. 24
Prohibiting disc ejection ………………………. 24
MP3/WMA INTRODUCTION ………….. 25
What are MP3/WMA? …………………………. 25
How are MP3/WMA files recorded and
played back? . ………………………………….. 25
MP3/WMA OPERATIONS ……………… 26
Playing a disc …………………………………….. 26
Locating a file or a particular portion
on a disc …………………………………………. 27
Selecting the playback modes ……………… 29
CONTENTS
*Temperature inside the car….
If you have parked the car for a long time in hot or
cold weather, wait until the temperature in the car
becomes normal before operating the unit.
BEFORE USE
*For safety….
• Do not raise the volume level too much, as this will
block outside sounds, making driving dangerous.
• Stop the car before performing any complicated
operations.
SOUND ADJUSTMENTS ………………. 31
Adjusting the sound ……………………………. 31
Selecting preset sound modes
(iEQ: intelligent equalizer) .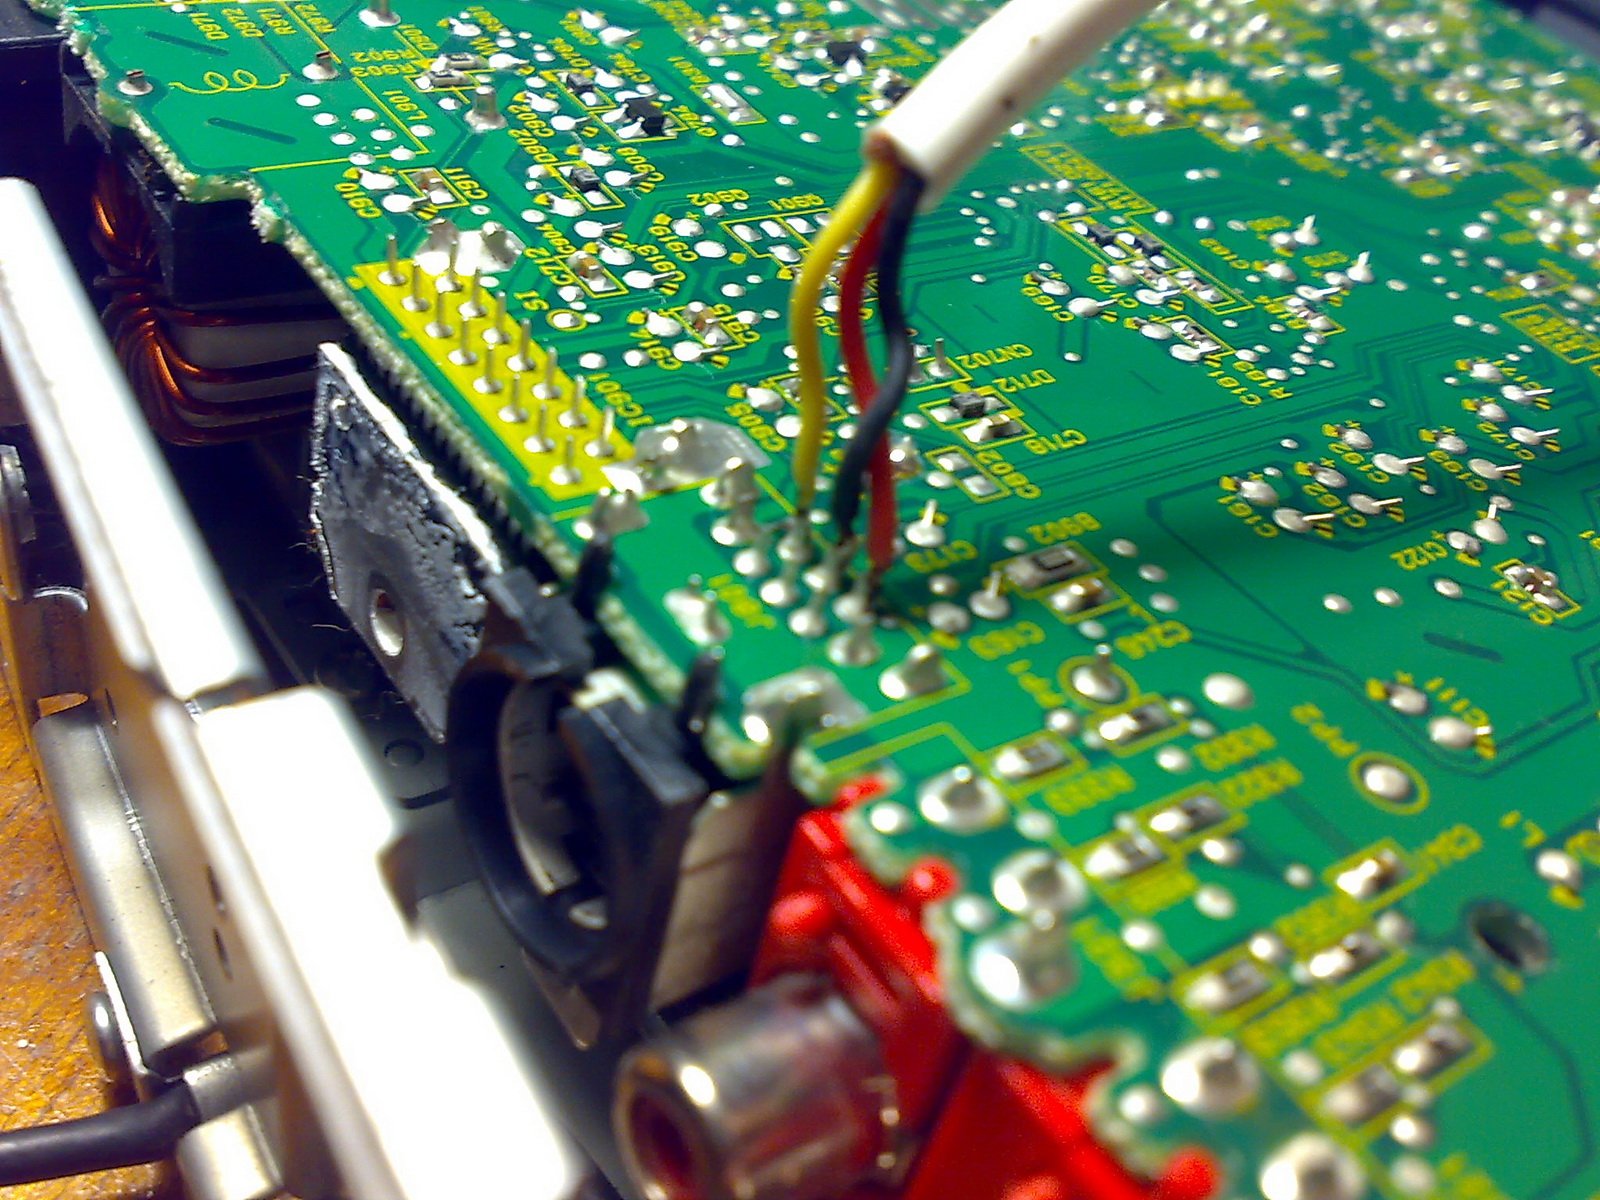 ………………… 32
Storing your own sound adjustments …….. 33
OTHER MAIN FUNCTIONS ……………. 34
Changing the general settings (PSM) ……. 34
Assigning names to CDs ……………………… 39
Changing the control panel angle …………. 40
Detaching the control panel …………………. 41
CD CHANGER OPERATIONS ………….. 42
Playing discs ……………………………………… 42
Selecting the playback modes ……………… 45
EXTERNAL COMPONENT OPERATIONS … 47
Playing an external component …………….. 47
DAB TUNER OPERATIONS ……………. 48
Tuning in to an ensemble and one of the
services ………………………………………….. 48
Storing DAB services in memory ………….. 49
Tuning in to a preset DAB service …………. 50
What you can do more with DAB ………….. 51
ADDITIONAL INFORMATION . ………… 52
TROUBLESHOOTING …………………. 53
MAINTENANCE ……………………….. 56
Handling discs ……………………………………. 56
SPECIFICATIONS ……………………… 57
EN02-03_KD-G807[EE]f.p65
1/15/04, 2:07 PM
3
Location of the buttons, Control panel
Страница 4
- Изображение
- Текст
ENGLISH
4
KD-G807
LOCATION OF THE BUTTONS
d
∞ (down) button
–10 button
Display window
f Disc information indicators—
(track/file),
TAG (ID3 Tag),
(folder)
g MP3 indicator
h CH (CD changer) indicator
j CD indicator
k LINE indicator
l WMA indicator
/ Main display
z RDS indicators—TP, PTY, AF, REG
x Equalizer pattern indicator
Audio level indicator
c EQ (equalizer) indicator
v FM band indicators—FM1, FM2, FM3
b AM band indicator
n Tuner reception indicators—ST (stereo), MO
(monaural)
m Play mode indicators—
(folder),
(disc),
RND (random), INT (intro), RPT (repeat)
, TRACK indicator
. Source/clock display
P LOUD (loudness) indicator
Q Audio level indicator
Volume level indicator
Control panel
1 Remote sensor
2
(standby/on attenuator) button
3 DISP (display) button
4 SEL (select) button
5 Control dial
6 Display window
7 TP/PTY (traffic programme/programme type)
button
8
0 (eject) button
(angle) button
9
5 (up) button
+10 button
p MODE button
q CD/CD-CH (CD changer) button
w FM/AM DAB button
e Reset button
r EQ (equalizer) button
t MO (monaural) button
y SSM (Strong-station Sequential Memory)
button
u INT (intro) button
i RPT (repeat) button
o RND (random) button
; Number buttons
a
4
/
¢ buttons
s
(control panel release) button
Display window
EN04-06_KD-G807[EE]f.p65
1/15/04, 2:08 PM
4
Remote controller, English
Страница 5
- Изображение
- Текст
ENGLISH
5
Remote controller
3 • Selects the preset stations (or services)
while listening to the radio (or the DAB
tuner).
Each time you press the button, the preset
station (or service) number increases, and
the selected station (or service) is tuned in.
• Skips to the first file of the previous folder
while listening to an MP3 or a WMA disc.
Each time you press the button, you can
move to the previous folder and start playing
the first file.
• While playing an MP3 disc on an MP3-
compatible CD changer;
– Skips to the previous disc if pressed
briefly.
– Skips to the previous folder if pressed and
held.
Note:
While playing a CD on a CD changer, this
always skips to the previous disc.
4 Functions the same as the control dial on the
main unit.
Note:
These buttons do not function for the
preferred setting mode (PSM) adjustment.
5 Selects the sound mode (iEQ: intelligent
equalizer).
Each time you press the button, the sound
mode (iEQ) changes.
6 Selects the source.
Each time you press the button, the source
changes.
7 • Searches for stations while listening to the
radio.
• Selects services while listening to the DAB
tuner if pressed briefly.
• Searches for ensembles while listening to
the DAB tuner if pressed and held.
• Fast-forwards or reverses the track/file if
pressed and held while listening to a disc.
• Skips to the beginning of the next track/file
or goes back to the beginning of the current
(or previous) tracks/files if pressed briefly
while listening to a disc.
1 • Turns on the unit if pressed when the unit is
turned off.
• Turns off the unit if pressed and held until
“SEE YOU” appears on the display.
• Drops the volume level in a moment if
pressed briefly.
Press again to resume the volume.
2 • Selects the band while listening to the radio
(or the DAB tuner).
Each time you press the button, the band
changes.
• Skips to the first file of the next folder while
listening to an MP3 or a WMA disc.
Each time you press the button, you can
move to the next folder and start playing the
first file.
• While playing an MP3 disc on an MP3-
compatible CD changer;
– Skips to the next disc if pressed briefly.
– Skips to the next folder if pressed and
held.
Note:
While playing a CD on a CD changer, this
always skips to the next disc.
SOUND
VOL
VOL
SOURCE
R
F
U
D
ATT
EN04-06_KD-G807[EE]f.p65
1/15/04, 2:08 PM
5
Preparing the remote controller, Installing the battery, English
Страница 6
- Изображение
- Текст
ENGLISH
6
Preparing the remote controller
Before using the remote controller:
• Aim the remote controller directly at the remote
sensor on the main unit. Make sure there is no
obstacle in between.
• Do not expose the remote sensor to strong
light (direct sunlight or artificial lighting).
Installing the battery
When the controllable range or effectiveness of
the remote controller decreases, replace the
battery.
1.
Remove the battery holder.
1) Push out the battery holder in the direction
indicated by the arrow using a ball-point
pen or a similar tool.
2) Remove the battery holder.
2.
Place the battery.
Slide the battery into the holder with the +
side facing upwards so that the battery is
fixed in the holder.
Lithium coin
battery (product
number: CR2025)
Remote sensor
(back side)
(back side)
3
. Return the battery holder.
Insert again the battery holder by pushing it
until you hear a clicking sound.
WARNING:
• Store the battery in a place where children
cannot reach.
If a child accidentally swallows the battery,
consult a doctor immediately.
• Do not recharge, short, disassemble, or heat the
battery or dispose of it in a fire.
Doing any of these things may cause the battery
to give off heat, crack, or start a fire.
• Do not leave the battery with other metallic
materials.
Doing this may cause the battery to give off
heat, crack, or start a fire.
• When throwing away or saving the battery,
wrap it in tape and insulate; otherwise, the
battery may start to give off heat, crack, or start
a fire.
• Do not poke the battery with tweezers or similar
tools.
Doing this may cause the battery to give off
heat, crack, or start a fire.
CAUTION:
DO NOT leave the remote controller in a place
(such as dashboards) exposed to direct sunlight
for a long time. Otherwise, it may be damaged.
EN04-06_KD-G807[EE]f. p65
p65
1/15/04, 2:08 PM
6
Basic operations, Turning on the power 1
Страница 7
- Изображение
- Текст
7
ENGLISH
4
Adjust the sound as you want.
(See pages 31 – 33.)
To drop the volume in a moment
Press
briefly while listening to any
source. “ATT” starts flashing on the display, and
the volume level will drop in a moment.
To resume the previous volume level, press the
button briefly again.
• If you turn the control dial, you can also restore
the sound.
To turn off the power
Press and hold
for more than one
second.
“SEE YOU” appears, then the unit turns off.
• If you turn off the power while listening to a
disc, disc play will start from where playback
has been stopped previously, next time you
turn on the power.
CAUTION on Volume Setting:
Discs produce very little noise compared with
other sources. If the volume level is adjusted for
the tuner, for example, the speakers may be
damaged by the sudden increase in the output
level. Therefore, lower the volume before playing a
disc and adjust it as required during playback.
Turning on the power
1
Turn on the power.
Note on One-Touch Operation:
When you select a source in step
2 below, the
power automatically comes on. You do not have
to press this button to turn on the power.
2
Select the source.
To operate the tuner (FM or AM),
see pages 10 – 20.
To play a CD,
see pages 21 – 24.
To play an MP3/WMA disc,
see pages 26 – 30.
To operate the CD changer,
see pages 42 – 46.
To operate the external component
(LINE IN), see page 47.
To operate the DAB tuner,
see pages 48 – 51.
3
Adjust the volume.
BASIC OPERATIONS
Volume level indicator
Volume level appears.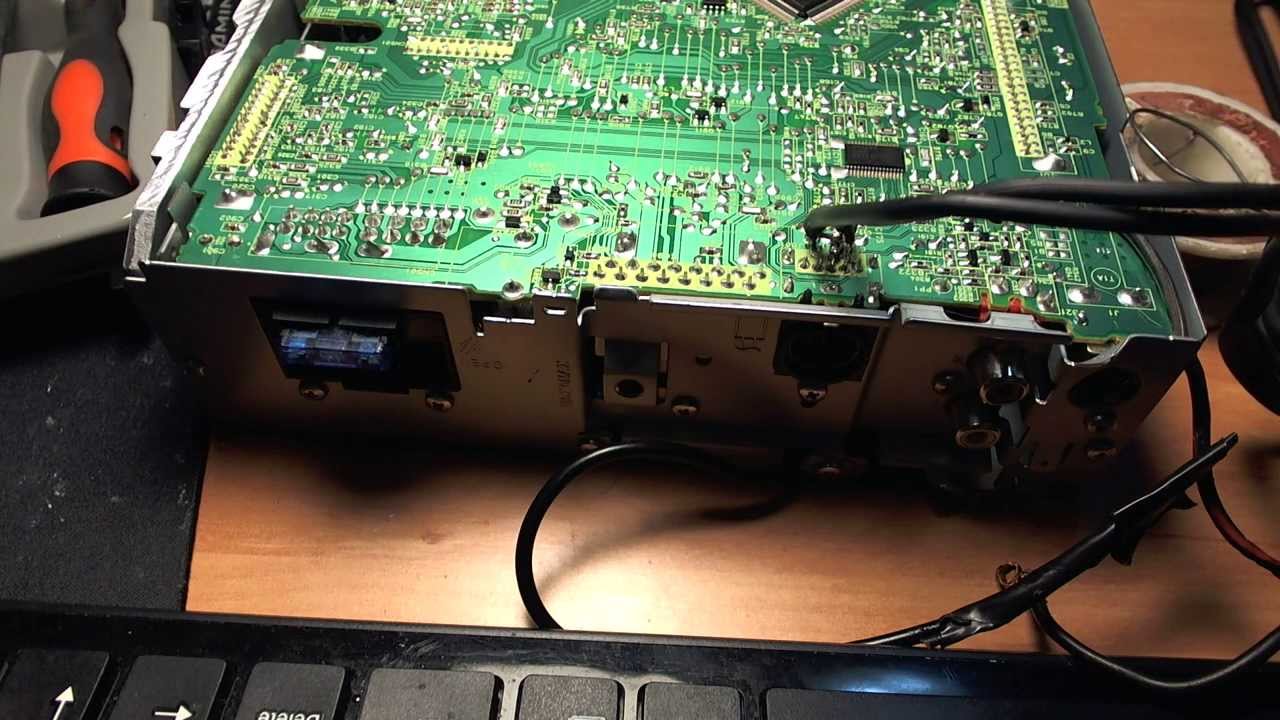
To increase the volume
To decrease the volume
1
3
2
EN07-09_KD-G807[EE]f.p65
1/15/04, 2:08 PM
7
Canceling the display demonstration
Страница 8
- Изображение
- Текст
8
ENGLISH
Canceling the display
demonstration
When shipped from the factory, display
demonstration has been activated, and starts
automatically when no operations are done for
about 20 seconds.
• It is recommended to cancel the display
demonstration before you use the unit for the
first time.
To cancel the display demonstration, follow
the procedure below:
1
Press and hold SEL (select) for more
than 2 seconds so that one of the
PSM items appears on the display.
(PSM: see pages 34 and 35.)
2
Select “DEMO MODE” if not shown
on the display.
3
Select “DEMO OFF.”
4
Finish the setting.
To activate the display demonstration, repeat
the same procedure and select “DEMO ON” in
step
3.
DEMO OFF
DEMO ON
EN07-09_KD-G807[EE]f.p65
1/15/04, 2:08 PM
8
Setting the clock
Страница 9
- Изображение
- Текст
9
ENGLISH
4
Set the clock system.
1 Select “CLOCK24H/12H.”
2 Select “CLOCK 24HOUR” or “CLOCK
12HOUR.”
1
2
5
Finish the setting.
Note:
To show the clock time on the display, see page 36.
To check other information during play, press
DISP (display).
Each time you press the button, the other
information will be shown on the lower part of the
display. (See page 36 for details.)
• Pressing DISP (display) with the unit turned off
will show the clock time for about 5 seconds.
Setting the clock
You can also set the clock system to either
24 hours or 12 hours.
1
Press and hold SEL (select) for more
than 2 seconds so that one of the
PSM items appears on the display.
(PSM: see pages 34 and 35.)
2
Set the hour.
1 Select “CLOCK HOUR” if not shown on
the display.
2 Adjust the hour.
1
2
3
Set the minute.
1 Select “CLOCK MINUTE.”
2 Adjust the minute.
1
2
EN07-09_KD-G807[EE]f.p65
1/15/04, 2:08 PM
9
Radio operations, Listening to the radio
Страница 10
- Изображение
- Текст
10
ENGLISH
RADIO OPERATIONS
Listening to the radio
You can use either automatic searching or manual
searching to tune in to a particular station.
Searching for a station automatically:
Auto search
1
Select the band (FM1 – 3, AM).
Each time you press the
button, the band changes as
follows:
* When “CLOCK DISP” is set to “CLK DISP
ON” (see page 36), the current indication will
soon change to the clock time.
Note:
This receiver has three FM bands (FM1, FM2,
FM3). You can use any one of them to listen to
an FM broadcast.
2
Start searching for a station.
When a station is received, searching stops.
To stop searching before a station is
received, press the same button you have
pressed for searching.
Note:
FM1 and FM2: 87.5 MHz – 108.0 MHz
FM3: 65.00 MHz – 74.00 MHz
Searching for a station manually:
Manual search
1
Select the band (FM1 – 3, AM).
Each time you press the
button, the band changes as
follows:
Note:
This receiver has three FM bands (FM1, FM2,
FM3). You can use any one of them to listen to
an FM broadcast.
To search for stations of
higher frequencies
To search for stations of lower frequencies
FM 1
(F1)
FM 2
(F2)
FM 3
(F3)
A M
(A1)
FM 1
(F1)
FM 2
(F2)
FM 3
(F3)
A M
(A1)
Selected band appears*.
Lights up when receiving an FM stereo
broadcast with sufficient signal strength.
EN10-13_KD-G807[EE]f.p65
1/15/04, 2:08 PM
10
Комментарии
Выделить → Я нашёл инструкцию для своей автомагнитолы здесь! #manualza
Кликнуть →
Отзывы JVC KD-X351BT | Автомагнитолы JVC
Подробные характеристики
Состав
- Радиоприемник
- есть, цифровой тюнер
- CD-проигрыватель
- нет
- MP3-проигрыватель
- есть
- DVD-проигрыватель
- нет
- Blu-ray-проигрыватель
- нет
- Усилитель
- есть
- Эквалайзер
- есть
- Навигатор
- нет
- ТВ-тюнер
- нет
Общие характеристики
- Номинальная и пиковая мощность
- 4×20 Вт/4×50 Вт
- Типоразмер
- 1 DIN
- Поддержка iPod/iPhone
- есть
- Интерфейс CD-ченджера
- нет
- Цвет
- черный
Поддерживаемые носители и форматы
- Форматы
- MP3, WMA, FLAC
Дисплей
- Тип дисплея
- монохромный
Управление
- Инфракрасный пульт
- нет
- Джойстик на руле
- возможно подключение
- Пауза при разговоре по телефону
- есть
- Автопоиск станций
- есть
Интерфейсы
- Входы
- USB
- USB на передней панели
- есть
- Вход аудио на передней панели
- есть
- Выходы
- PreAmp тыл, PreAmp сабвуфер
- Поддержка Bluetooth
- есть
- Поддержка профиля A2DP
- есть
- Подсоединение по стандарту ISO
- есть
Защита
- Съемная панель
- есть
Тюнер
- Поддержка диапазонов
- FM, СВ, ДВ
- Поддержка RDS
- RDS, RDS/EON, RDS/PTY
- Переключение стерео/моно
- есть
- Тюнер с дальним приёмом
- есть
- Число предустановок FM/AM
- 18 / 6
Дополнительно
- Регулировка тембра
- есть
- Число бит ЦАП
- 24
- Количество полос эквалайзера
- 13
- Количество предустановок эквалайзера
- 11
- Поддержка тегов ID3
- есть
- Тон-компенсация
- есть
- Размеры (ШхВхГ)
- 182x52x159 мм
- Особенности
- 2 разъема выходов предусилителя (передний + переключение между тыловыми АС и сабвуфером)
Перед покупкой уточняйте технические характеристики и комплектацию у продавца.![]()
Видео обзоры JVC KD-X351BT
АВТОМАГНИТОЛА JVC KD-X351BT | Обзор | Интернет магазин TVMusic Обзор JVC KD-X351BT – мультимедийный ресивер с Bluetooth Bluetooth Car audio JVC KD-X351BT – test / menu / settings Proton Saga FLX JVC KD X351BT Single DIN Обзор автомагнитолы JVC KD-X351BT Разопаковане на аудио плеър за кола JVC KD-X351BT KD-X351BT & KD-X252 Unboxing วิธีเชื่อมต่อบลูทูช BLUETOOTH JVC KD X351BT CAR AUDIO2018 ราคา2800บาทT 084 5260003
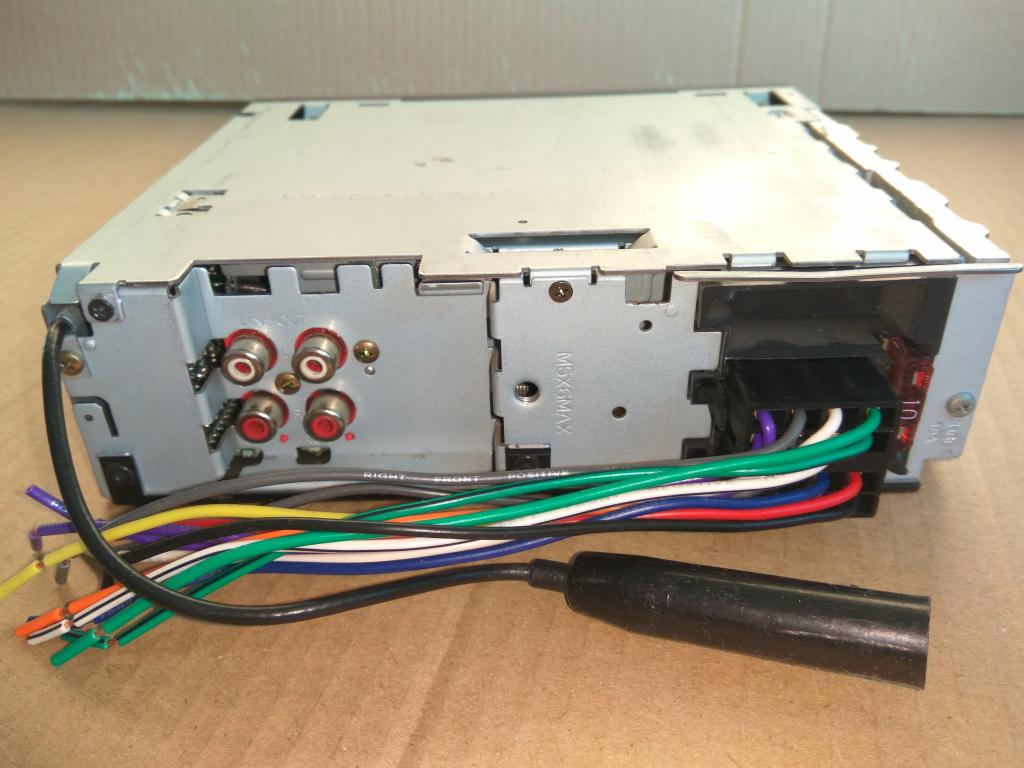
автомобильный – DIY Aux In для подключения к автомобильной стереосистеме JVC KD-G151
спросил
Изменено 1 год, 4 месяца назад
Просмотрено 1к раз
\$\начало группы\$
Я хочу подключить телефон с помощью кабеля с разъемом (дополнительный вход) к автомобильной стереосистеме без дополнительного входа (марка: JVC KD-G151).
Вот логика даташита: (извините за недочеты, я просто любитель с очень ограниченными знаниями)
- От DSP_DAC сигналы RO и LO поступают на канал 1.5V (AC или DC я не знаю)
- Далее фильтр нижних частот CD, выходное напряжение 4,5В (переменное или постоянное не знаю)
- Последний блок E.VOLUME, где входное напряжение 4,4 В (переменное или постоянное, я не знаю) Подключил сигналы после резисторов R595 и R585, работает отлично. Но одна проблема: сначала мне нужно было подключить разъем к телефону, запустить музыку и подключить aux к резисторам (сейчас я использую переключатель) При другом порядке не работает, сигнал не проходит на E.VOLUME.
Я могу измерить 4,4 В на входе E.volume, поэтому прямое подключение к моему телефонному разъему плохо звучит (может ли это повредить мой телефон?)
Кто-нибудь знает, куда мне его подключить, чтобы не повредить источник входного сигнала? Перед низкочастотным фильтром компакт-диска? С конденсатором для блокировки постоянного напряжения? Спасибо.
- автомобильный
- стерео
\$\конечная группа\$
1
\$\начало группы\$
Я подключил дополнительный кабель к своему JVC, он работает хорошо, единственный недостаток в том, что вы больше не можете воспроизводить компакт-диски. Попробую впаять два переключателя вместо резисторов R595 и R585. Это позволит мне переключаться между воспроизведением компакт-дисков и прослушиванием через Aux. R595 находится на левом канале, а R585 — на правом канале.
\$\конечная группа\$
1
\$\начало группы\$
Мне просто нужно было сделать это для моего KDG632.
Я попытался припаять к разъему JBus вместо использования аксессуара KS-U58. На YouTube есть видео, но это был не тот ряд контактов для моей модели. Но когда я проверил правильный ряд, сам мой источник звука был неисправен, и, таким образом, последовала веселая джиговая игра, в которой все пошло не так. Правильный ряд из 3 контактов [левый, земля, правый] находился рядом с квадратной выемкой на внешнем кольце разъема.
Вот я и нашел прямой путь рядом с микросхемой усилителя. Существует микросхема управления громкостью, которая принимает сигнал, скажем, от разъема для наушников на телефоне. Есть 8 каналов. Чип: TDA7419. Я выбрал контакты 5 и 6 для левого и правого канала соответственно и контакт 15 для заземления сигнала. Это сработало прекрасно. Я припаял прямо к чипу, хотя можно было бы как-то отфильтровать вход от посторонних шумов.
Это 28-контактный чип.
Мне также пришлось записать беззвучный аудио компакт-диск с http://duramecho.com/, чтобы сохранить выбор компакт-диска в качестве входного сигнала. Мне как-то удалось сломать чип радио и JBus, поэтому пришлось это сделать. ..
..
В противном случае я бы просто припаял разъем JBus, но убедился, что ваш тестовый сигнал надежен!
Я думаю, что это ответ на вопрос как альтернативное решение на случай, если оно понадобится в будущем.
\$\конечная группа\$
Зарегистрируйтесь или войдите в систему
Зарегистрироваться через Facebook
Зарегистрируйтесь, используя электронную почту и пароль
Опубликовать как гость
Электронная почта
Требуется, но никогда не отображается
Опубликовать как гость
Электронная почта
Требуется, но не отображается
Нажимая «Опубликовать свой ответ», вы соглашаетесь с нашими условиями обслуживания, политикой конфиденциальности и политикой использования файлов cookie
.
JVC KD-G801 РУКОВОДСТВО ПО ЭКСПЛУАТАЦИИ Скачать PDF
Содержание
3страница из 57
- Содержание
- Оглавление
- Поиск неисправностей
- Закладки
Реклама
СОДЕРЖАНИЕ
Как сбросить блок
Как использовать кнопку режима
СОДЕРЖА
Remote Controller
Preparing the Remote Controller
Basic Operations
Turning on the Power
Canceling the Display Demonstration
Setting the Clock
Radio Operations
Прослушивание радио
Сохранение станций в памяти
Ручная настройка
Tuning in to a Preset Station
Rds Operations
What You Can Do with RDS
Other Convenient RDS Functions and Adjustments
CD Operations
Playing a CD
Поиск трека или отдельной части на CD
Выбор режимов воспроизведения CD
Воспроизведение текста на CD
Запрещение выброса дисков
MP3/WMA ВВЕДЕНИЕ
Что представляет собой mp3/WMA
Как записываются файлы mp3/WMA.

Воспроизведение диска
Поиск файла или отдельной части на диске
Выбор режимов воспроизведения
- 0064 Sound Adjustments
Adjusting the Sound
Selecting Preset Sound Modes (Ieq: Intelligent Equalizer)
Storing Your Own Sound Adjustments
Other Main Functions
Changing the General Settings (PSM)
Присвоение имен компакт-дискам
Изменение угла наклона панели управления
Отсоединение панели управления
CD Changer Operations (только для KD-G801)
Игровая диски
Выбор мод воспроизведения
- .
 Внешний компонент. Только для работы. Воспроизведение внешнего компонента
ОПЕРАЦИИ С ТЮНЕРОМ DAB (только для KD-G801)
Настройка ансамбля и одной из служб
Storing DAB Services in Memory
Tuning in to a Preset DAB Service
What You Can Do more with DAB
Additional Information
Troubleshooting
Maintenance
Работа с дисками
Технические характеристики
CD-РЕСИВЕР
CD-РЕСИВЕР
ПРИЕМНИК CD
CD-РЕСИВЕР
KD-G801/KD-G701
• Данное устройство оснащено демонстрационным дисплеем.
