
Инструкция и руководство на русском
74 страницы подробных инструкций и пользовательских руководств по эксплуатации
07:22
Ремонт плазменного телевизора SAMSUNG PS43D490A1W типовая неисправность
13:32
SAMSUNG PS42A410C1 PLASMA TV Repair power light works but does not start
04:13
Ремонт телевизора samsung ps42a410c1
05:30
Ремонт плазмы Samsung
02:10
Ремонт Плазмы SAMSUNG PS-42C92HR. Не включается.
00:59
SAMSUNG PS42A410C1 Шасси F59A
01:08
Ремонт телевизора samsung ps42a410c1 часть 2
05:55
Samsung PS42A410 plasma Ремонт телевизоров Samsung
Связывайтесь с SAMSUNG по всему миру Если у вас есть предлож…
Плазменный телевизор, Руководство пользователя, Удивительные возможности
- Изображение
- Текст
- Содержание
Связывайтесь с SAMSUNG по всему миру
Если у вас есть предложения или вопросы по продуктам Samsung, связывайтесь с
информационным центром Samsung.
Country
Customer Care Centre
Web Site
RUSSIA
8-800-555-55-55
www.samsung.ru
UKRAINE
8-800-502-0000
www.samsung.com
Благодарим за приобретение продукта
компании Samsung. Для получения более
полного обслуживания зарегистрируйте свое
устройство по адресу:
www.samsung.com/global/register
удивительные
возможности
Плазменный
телевизор
руководство
пользователя
Модель Серийный номер
BN68-01423E-01
PS42A410
PS50A410
BN68-01423E-00[Rus].indd 2-3
2008-04-08 ¿АИД 8:44:25
- Cover
- Eng
- User Instructions
- Contents
- Checking Parts
- Using the Stand-Base
- Control Panel
- Connection Panel
- Viewing the Remote Control
- Switching Your Television On and Off
- Viewing the Menus
- Plug & Play Feature
- Using the TOOLS Button
- Viewing External Signal Sources
- Editing Device Names
- Storing Channels Automatically
- Storing Channels Manually
- Adding / Locking Channels
- Sorting the Stored Channels
- Assigning Names to Channels
- Fine Tuning Channel Reception
- LNA (Low Noise Amplifier
- Changing the Picture Standard
- Customizing the Picture Settings
- Configuring Detailed Settings on the Picture
- Picture Options
- Resetting the Picture Settings to the Factory Defaults
- Sound Features
- Selecting the Sound Mode (depending on the model
- Connecting Headphones (Sold separately)
- Language / Melody / Light Effect / Entertainment /Energy Saving / PIP
- Setting up Your PC Software (Based on Windows XP)
- Input Mode (PC)
- Setting the PC
- Teletext Feature (depending on the model)
- Wall Mount Kit Specifications (VESA)
- Wall- mount adjustment (Sold separately)
- How to assemble the Stand-Base (depending on the model)
- Troubleshooting
- Specifications
- Rus
- Eng
User instructions
Страница 2
- Изображение
- Текст
English –
© 2008 Samsung Electronics Co. , Ltd. All rights reserved.
User Instructions
Screen Image retention
Do not display a still image (such as on a video game or when hooking up a PC to this PDP) on the
plasma monitor panel for more than 2 hours as it can cause screen image retention. This image
retention is also known as “screen burn”. To avoid such image retention, reduce the degree of
brightness and contrast of the screen when displaying a still image.
Height
The PDP can normally operate only under 2000m in height. It might abnormally function at a place
over 2000m in height so do not install and operate there.
Heat on the top of the PDP TV
The top side of the product may be hot after long period of use as heat dissipates from the panel
through the vent hole in the upper part of the product. This is normal and does not indicate any defect
or operation failure of the product. However, children should be prevented from touching the upper
part of the product.
The product is making a ‘cracking’ noise.
A ‘cracking’ noise may occur when the product contracts or expands due to a change of surrounding
environment such as temperature or humidity. This is normal and not a defect of the unit.
Cell Defects
The PDP uses a panel consisting of 1,230,000(SD-level) to 3,150,000(HD-level) pixels which require
sophisticated technology to produce. However, there may be few bright or dark pixels on the screen.
These pixels will have no impact on the performance of the product.
Avoid operating the TV at temperatures below 5°C(41°F)
A still image displayed too long may cause permanent damage to the PDP Panel.
Watching the PDP TV in 4:3 format for a long period of time may leave traces
of borders displayed on the left, right and centre of the screen caused by the
difference of light emission on the screen. Playing a DVD or a game console
may cause similar effect to the screen. Damages caused by the above effect are
not covered by the Warranty.
Afterimage on the Screen.
Displaying still images from Video games and PC for longer than a certain period of time may
produce partial afterimages. To prevent this effect, reduce the ‘brightness’ and ‘contrast’ when
displaying still images.
Warranty
– Warranty does not cover any damage caused by image retention.
– Burn-in is not covered by the warranty.
Installation
Be sure to contact an authorized service centre, when installing your set in a location with heavy
dust, high or low temperatures, high humidity, chemical substance and where it operates continually
such as the airport, the train station etc. Failure to do so may cause a serious damage to your set.
Contact SAMSUNG WORLDWIDE
If you have any questions or comments relating to Samsung products, please contact the SAMSUNG
customer care centre. (See back cover for more informations.)
BN68-01423EF-00Eng.indb 2
2008-04-14 오후 6:36:27
Press Important Note Contents General Information …
Страница 3
- Изображение
- Текст
English –
Symbols
☛
➢
Press
Important
Note
Contents
General Information
User Instructions ……………………………………… 2
Checking Parts ………………………………………… 4
Using the Stand-Base ………………………………. 4
Control Panel …………………………………………. 5
Connection Panel …………………………………….. 6
Viewing the Remote Control ……………………… 8
Operation
Switching Your Television On and Off …………. 9
Viewing the Menus . ………………………………….. 9
Plug & Play Feature ……………………………….. 10
Using the TOOLS Button ………………………… 12
Viewing External Signal Sources ……………… 12
Editing Device Names …………………………….. 13
Channel Control
Storing Channels Automatically ……………….. 13
Storing Channels Manually ……………………… 14
Adding / Locking Channels ……………………… 15
Sorting the Stored Channels ……………………. 16
Assigning Names to Channels …………………. 16
Fine Tuning Channel Reception ……………….. 17
LNA (Low Noise Amplifier) ………………………. 17
Picture Control
Changing the Picture Standard ………………… 18
Customizing the Picture Settings . …………….. 18
Configuring Detailed Settings on the Picture .. 19
Picture Options ……………………………………… 20
Resetting the Picture Settings to the Factory
Defaults ………………………………………………… 22
Sound Control
Sound Features …………………………………….. 23
Selecting the Sound Mode
(depending on the model) ……………………….. 24
Connecting Headphones (Sold separately) .. 24
Function Description
Time Features ……………………………………….. 25
Language / Melody / Light Effect /
Entertainment / Energy Saving / PIP ………… 26
PC Display
Setting up Your PC Software
(Based on Windows XP) …………………………. 27
Input Mode (PC) …………………………………. …. 28
…. 28
Setting the PC ……………………………………….. 29
Appendix
Teletext Feature
(depending on the model) .. 30
Wall Mount Kit Specifications (VESA) ……….. 32
Wall- mount adjustment (Sold separately) …. 33
How to assemble the Stand-Base
(depending on the model) ……………………….. 34
Troubleshooting …………………………………….. 35
Specifications ………………………………………… 36
English
BN68-01423EF-00Eng.indb 3
2008-04-14 오후 6:36:27
Checking parts, Using the stand-base
Страница 4
- Изображение
- Текст
English – 4
Checking Parts
Owner’s Instructions
Remote Control/
AAA Batteries
Power Cord
Cloth-Clean
Warranty Card/
Registration Card/
Safety Guide Manual
Cover-Bottom / Screws (2ea)
(Refer to page 34)
Ferrite Core for Power Cord
Ferrite Core for S-Video
Sold Separately
Antenna Cable
Component Cables
Audio Cables
PC Cable
Scart Cable
PC Audio Cable
HDMI Cable
HDMI/DVI Cable
➢
Ferrite Core (Power Cord, S-Video)
The ferrite cores are used to shield the cables from interference.
When connecting a cable, open the ferrite core and clip it around
the cable near the plug.
Using the Stand-Base
➢
Two or more people should carry
the PDP. Never lay the PDP on the
floor because of possible damage
to the screen. Always keep the
PDP upright.
The PDP can rotate 20 degrees in
right and left directions.
-20° ~ 20°
BN68-01423EF-00Eng.indb 4
2008-04-14 오후 6:36:31
Control panel
Страница 5
- Изображение
- Текст
English – 5
Control Panel
1
SOURCE
Toggles between all the available input sources
(
TV, Ext.1, Ext., AV, S-Video, Component,
PC, HDMI1, HDMI).
2
MENU
Press to see an on-screen menu of your TV’s
features.
3
–
+
Press to increase or decrease the volume. In
In
the on-screen menu, use the
–
+ buttons
as you would use the ◄ and ► buttons on the
remote control.
4
C/P.
Press to change channels. In the on-screen
menu, use the
C/P. buttons as you
would use the ▲ and ▼ buttons on the remote
control.
5
ENTER
In the on-screen menu, use this button as you
would use the
ENTER button on the remote
control.
6
POWER
Press to turn the TV on and off.
Power Indicator
Blinks and turns off when the power is on and
lights up in stand-by mode.
Remote Control Sensor
Aim the remote control towards this spot on the
TV.
7
Speakers
Front (or Side) Panel
➢
The product colour and shape may vary depending on the model.
7
BN68-01423EF-00Eng.indb 5
2008-04-14 오후 6:36:32
Connection panel
Страница 6
- Изображение
- Текст
English –
Connection Panel
Continued. ..
..
☛
Whenever you connect an audio or video system to your set, ensure that all elements are
switched off.
When connecting an external device, match the colour of the connection terminal to the cable.
1
POWER IN
Connect the supplied power cord.
2
COMPONENT IN
Audio (AUDIO L/R) and video (Y/P
B
/P
R
) inputs
for Component.
3
PC IN(PC) / (AUDIO)
Connect to the video and audio output jack on
your PC.
4
EXT 1, EXT
Inputs or outputs for external devices, such as
VCR, DVD, video game device or video disc
players.
Input/Output Specification
Connector
Input
Output
Video Audio(L/R) RGB Video + Audio(L/R)
EXT 1 ✔
✔
✔
Only TV output is
available.
EXT 2 ✔
✔
Output you can
choose.
5
Connecting external Audio Devices
Connect RCA audio signals from the TV to an
external source, such as Audio equipment.
6
SERVICE
− Connector for service.
− Connect the serial jack between the
electro-motion wall mount bracket and your
TV when you want to adjust the TV viewing
angle using your remote control.
Rear Panel
➢
The product colour and shape may vary depending on the model.
Cable Television
Network
or
or
1
4
3
2
5
7
8
6
BN68-01423EF-00Eng.indb 6
2008-04-14 오후 6:36:35
No additional Audio connection is needed for an HDMI to HD…
Страница 7
- Изображение
- Текст
English –
7
HDMI IN 1,
– No additional Audio connection is needed for
an HDMI to HDMI connection.
– When using an HDMI/DVI cable connection,
you must use the HDMI IN 2 jack.
➢
What is HDMI?
– “High Definition Multimedia interface”
allows the transmission of high definition
digital video data and multiple channels of
digital audio.
– The HDMI/DVI terminal supports DVI
connection to an extended device with
the appropriate cable (not supplied). The
difference between HDMI and DVI is that
the HDMI device is smaller in size, has
the HDCP (High Bandwidth Digital Copy
Protection) coding feature installed, and
supports multi – channel digital audio.
DVI IN (HDMI) AUDIO R/L
DVI audio outputs for external devices.
8
ANT IN
75Ω Coaxial connector for Aerial/Cable
Network.
Supported modes for HDMI/DVI and Component
480i 480p 576i 576p 720p 1080i
HDMI/DVI 50Hz
X
X
X
O
O
O
HDMI/DVI 60Hz
X
O
X
X
O
O
Component
O
O
O
O
O
O
➢
The product colour and shape may vary depending on the model.
Side Panel
1
S-VIDEO or VIDEO / AUDIO L/R
Video (S-Video or Video) and audio inputs for
external devices, such as a camcorder or VCR.
2
Headphones jack
You can connect a set of headphones if you
wish to watch a television programme without
disturbing the other people in the room.
➢
Prolonged use of headphones at a high
volume may damage your hearing.
2
or
1
BN68-01423EF-00Eng.indb 7
2008-04-14 오후 6:36:37
Viewing the remote control
Страница 8
- Изображение
- Текст
English –
Viewing the Remote Control
1
POWER button
(turns the TV on and off)
2
Selects the TV mode directly
3
Number buttons for direct
channel access
4
One/Two-digit channel
selection
5
Temporary sound switch-off
6
Volume increase
Volume decrease
7
Use to quickly select
frequently used functions.
8
Control the cursor in the
menu
9
Use to see information on
the current broadcast
@
Channel control button
(Refer to page 15)
#
Available source selection
$
Previous channel
%
Next channel
Previous channel
^
Returns to the previous
menu
&
Exit the on-screen menu
*
Displays the main on-screen
menu
(
Picture size selection
)
Selects the HDMI mode
directly
a
Picture effect selection
(Refer to page 18)
Teletext Functions
(Refer to page 30)
2
Exit from the teletext display
(depending on the model)
7
Teletext size
9
Teletext reveal
0
Fastext topic selection
!
Teletext display/mix both
teletext information and the
normal broadcast
12 Teletext store
#
Teletext mode selection
(LIST/FLOF)
$
Teletext sub page
%
P :Teletext next page
P :Teletext previous page
^
Teletext hold
&
Teletext cancel
*
Teletext index
Continued. ..
..
BN68-01423EF-00Eng.indb 8
2008-04-14 오후 6:36:38
Страница 9
- Изображение
- Текст
English –
Installing Batteries in the Remote Control
1 Lift the cover at the back of the remote control upward as
shown in the figure.
Install two AAA size batteries.
➢
Make sure to match the “
+” and “–” ends of the
batteries with the diagram inside the compartment.
Do not mix battery types, i.e. alkaline and
manganese.
Close the cover as shown in the figure.
➢
Remove the batteries and store them in a cool and dry
place if you won’t be using the remote control for a long time. The remote control can be used up
to about 23 feet from the TV. (Assuming typical TV usage, the batteries last for about one year.)
➢
If the remote control doesn’t work! Check the following:
1. Is the TV power on?
2. Are the plus and minus ends of the batteries reversed?
3. Are the batteries drained?
4. Is there a power cut, or is the power cord unplugged?
5. Is there a special fluorescent light or a neon sign nearby?
Switching Your Television On and Off
The main lead is attached to the rear of the television.
1 Plug the main lead into an appropriate socket.
➢
The main voltage is indicated on the rear of the television and the frequency is 50 or 60Hz.
Press the (Power) button (On/Off) on the front of the television or press the POWER button on the
remote control to switch the television on. The programme that you were watching last is re-selected
automatically. If you have not yet stored any channels, no clear picture appears. Refer to “Storing
Channels Automatically” on page 13 or “Storing Channels Manually” on page 14.
➢
If the television is initially powered on, several basic customer settings proceed automatically.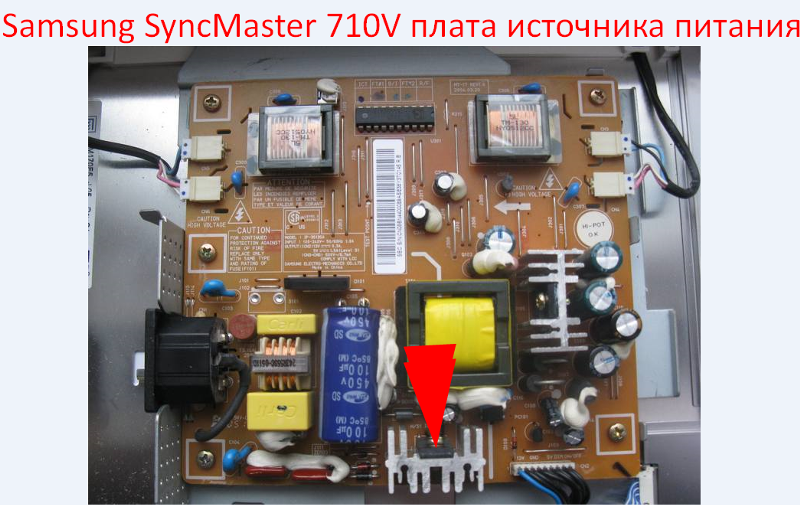
Refer to “Plug & Play Feature” on page 10.
To switch the television off, press the (Power) button (On/Off) on the front of the television or press
the
POWER button on the remote control.
4 To switch the TV on, press the (Power) button (On/Off) on the front of the TV or press the POWER
button or number buttons on the remote control.
Viewing the Menus
1 Press the MENU button.
The main menu is displayed on the screen.
Its left side has six icons:
Picture, Sound, Channel, Setup,
Input.
Press the ▲ or ▼ button to select one of the icons.
Press the
ENTER button to access the icon’s sub-menu.
Press the ▲ or ▼ button to move to items in the menu.
Press the
ENTER button to enter items in the menu.
4 Press the ▲/▼/◄/► button to change the selected items.
Press the
RETURN button to return to the previous menu.
5 Press the EXIT button to exit from the menu.
Move
Enter
Exit
Mode
: Standard
Cell Light
Contrast
5
Brightness
45
Sharpness
50
Colour
50
Tint G50 R50
Detailed Settings
Picture Options
Reset
: OK
Picture
T V
BN68-01423EF-00Eng.indb 9
2008-04-14 오후 6:36:39
Plug & play feature
Страница 10
- Изображение
- Текст
English – 10
Plug & Play Feature
When the television is initially powered on, several basic
customer settings proceed automatically and subsequently.
The following settings are available.
☛
If you accidentally select the wrong country for your TV, the
characters on the screen may be wrongly displayed.
1 If the television is in standby mode, press the POWER button
on the remote control. The message
Start Plug & Play is
displayed. Press the
ENTER button.
The Language menu will automatically appear after several
seconds.
Select the appropriate language by pressing the ▲ or ▼
button.
Press the
ENTER button. The message Select Home Use
when installing this TV in your home. is displayed.
4 Press the ◄ or ► button to select Store Demo or Home Use,
then press the
ENTER button. The message to check the
connected status of the antenna is displayed.
➢
The default selection is
Home Use.
➢
We recommend setting the TV to Home Use mode for the
best picture in your home environment.
➢
Store Demo mode is only intended for use in retail
environments.
➢
If the unit is accidentally set to
Store Demo mode and you
want to return to
Home Use (Standard): Press the Volume
button. When the volume OSD is displayed, press and
hold the
MENU button for 5 seconds.
5 Make sure that the antenna is connected to the TV.
Press the
ENTER button. The Country menu is displayed.
Select your country or area by pressing the ▲ or ▼ button.
Press the
ENTER button.
Continued…
Plug & Play
Start Plug & Play.
OK
Enter
Plug & Play
Language
Move
Enter
English
Deutsch
Français
Italiano
▼
Plug & Play
Select ‘Home Use’
when installing this TV in your home.
Move
Enter
Store Demo
Home Use
Plug & Play
Check antenna input.
Enter
Skip
OK
Plug & Play
P 1 C —
40 MHz
0 %
Enter
Skip
Start
Plug & Play
Country
▲
United Kingdom
Austria
Eastern Europe
Others
Move
Enter
Skip
BN68-01423EF-00Eng.indb 10
2008-04-14 오후 6:36:41
Комментарии
Выделить → Я нашёл инструкцию для своего телевизора здесь! #manualza
Кликнуть →
Ремонт телевизора Samsung PS42A410C1 Не работает. Сервисный Центр samsung Киев
Не работает, не включается
Добавить комментарий (1)
Сервисный центр Территория Apple предлагает Ремонт телевизора Samsung PS42A410C1 Не работает всех моделей,
а также производим все виды ремонта.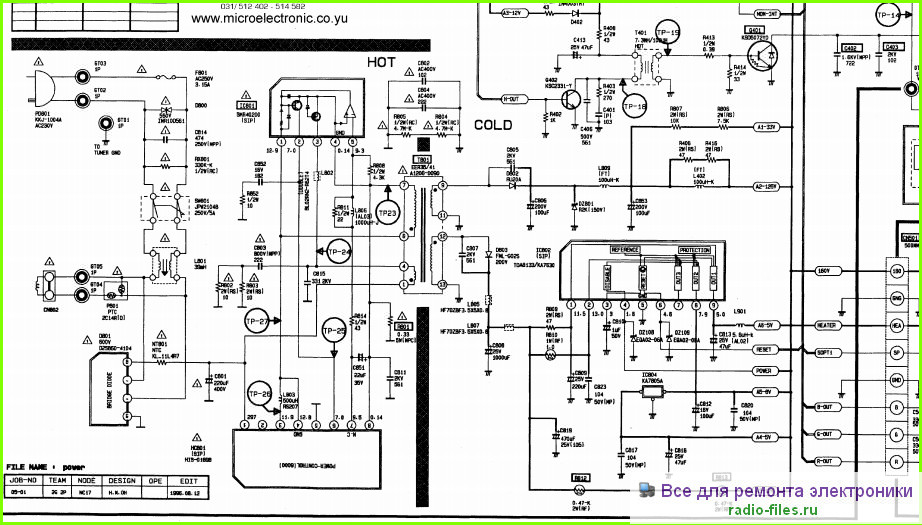
Наличие запчастей и возможность ремонта – звоните нам и уточняйте.
Общие проблемы
Не работает Wi-Fi
от 480 грн.
Не включается
от 360 грн.
Попала влага
от 340 грн.
Просит iTunes
от 340 грн.
Забыт пароль
от 340 грн.
Зависает (обновить ПО)
от 340 грн.
Экран/дисплей
Не работает сенсор
от 480 грн.
Разбилось стекло
от 480 грн.
Нет подсветки
от 410 грн.
Не работает часть экрана
от 600 грн.
Не гаснет при разговоре
от 340 грн.
Задняя крышка
Поцарапана зад. крышка
от 340 грн.
Треснула зад. крышка
от 340 грн.
Разбит полностью
от 480 грн.
Зарядка
Не заряжается
от 340 грн.
Быстро садится
от 340 грн.
Плохой контакт
от 340 грн.
Греется
от 340 грн.
Связь (Сеть)
Нет сети
от 340 грн.
Не видит SIM
от 340 грн.
Сеть ловит плохо
от 340 грн.
Кнопки
Ремонт кнопки Home
от 320 грн.
Ремонт кнопки вкл/выкл
от 340 грн.
Ремонт кнопки вибро
от 340 грн.
Ремонт кнопки гром-сти
от 340 грн.
Камеры
Не работает главная
от 360 грн.
Не фокусирует главная
от 360 грн.
Не работает фронтальная
от 340 грн.
Не фокусирует фронтальная
от 340 грн.
Вибрация
Не работает
от 340 грн.
от 340 грн.
Не всегда срабатывает
от 340 грн.
Разговор/Динамики
Динамик не работает
от 340 грн.
Динамик хрипит
от 320 грн.
Динамик тихий
от 340 грн.
Не работают наушники
от 340 грн.
Собеседник не слышит
от 340 грн.
Собеседник плохо слышит
от 340 грн.
Я не слышу собеседника
от 320 грн.
Плохо слышу собеседника
от 320 грн.
Раздел:Ремонт телевизоровТеги:samsung
РЕШЕНО: Не могу включить телевизор. – Телевидение Samsung
Руководства по ремонту и поддержке вашего телевизора Samsung.
2376 вопросов Посмотреть все
Утья Кумар @uthyakumar
Респ: 889
Опубликовано:
Опции
- Постоянная ссылка
- История
- Подписаться
My Samsung 32f5500 Телевизор красный индикатор дежурного режима мигает 2 раза при включении питания.
Ответил! Посмотреть ответ У меня тоже есть эта проблема
Хороший вопрос?
Да №
Оценка 74
Отмена
Выбранное решение
старая турция03 @oldturkey03
Респ: 729.1k
942
842
2,3к
Опубликовано:
Опции
- Постоянная ссылка
- История
начните с попытки перезагрузить телевизор. Отключите шнур питания от розетки, затем нажмите и удерживайте кнопку питания на телевизоре (не на пульте) не менее 10 секунд. Затем подождите несколько минут, снова подключите телевизор и нажмите кнопку питания один раз.
2 мигания на телевизорах Samsung обычно указывают на плохое питание. Вам нужно будет сообщить нам точный номер модели вашего телевизора, чтобы мы могли проверить это и проверить плату питания. Было бы полезно, если бы вы разместили несколько изображений всех своих досок, чтобы мы могли видеть то, что видите вы. Используйте для этого это руководство. Проверьте платы на наличие явно поврежденных компонентов, таких как протекающие куполообразные крышки и т. д.
д.
Совет сотрудников iFixit: Это очень полезный ответ! Для получения дополнительной информации, которая может помочь, вы можете перейти на эту страницу, которая включает информацию от нескольких участников нашего сообщества (включая oldturkey03), а также из других источников.
Был ли этот ответ полезен?
Да №
Оценка 44
Отменить
СУМАСШЕДШАЯ ДЕВУШКА @lunaticgirl
Реп: 157
Опубликовано:
Опции
- Постоянная ссылка
- История
Проверьте, есть ли у вашего телевизора другое соединение, такое как PS3 или другие устройства, подключенные через HDMI. Если да… у нас была такая же проблема… телевизор моргает и не включается. Пробовал отключать его от розетки и нажимал кнопку питания на 10 секунд, но телевизор все равно не включается. Затем я попытался открыть игровую приставку, которая подключена к порту HDMI 2, и телевизор включился. Наши дети выключили игровую приставку и не вернули источник на порт HDMI 1, поэтому наш телевизор не включился, и мигает красный свет.. надеюсь, это поможет..
Был ли этот ответ полезен?
Да №
Оценка 13
Отменить
Джаефф @jayeff
Респ: 398.8k
9
324
1,4к
Опубликовано:Опции
- Постоянная ссылка
- История
Привет @ Джеймс Грей
Вы проверили, работает ли розетка, к которой подключен телевизор?
Был ли шторм или отключение электричества непосредственно перед тем, как телевизор не включился?
Попробуйте выполнить сброс питания и проверьте, работает ли это:
Выключите электрическую розетку (если в ней есть выключатель), к которой подключен телевизор, и отсоедините кабель питания телевизора от розетки.
Нажмите и удерживайте кнопку питания телевизора (расположенную сбоку телевизора) в течение 30 секунд, чтобы рассеять остаточную мощность телевизора.
Снова подсоедините шнур питания к телевизору и включите розетку (если на ней есть выключатель)
Включите телевизор, кратковременно нажав кнопку питания телевизора
Если телевизор включается, вы можете использовать кнопки сбоку для выбора каналов, увеличения и уменьшения громкости и выключения телевизора (еще раз нажмите кнопку питания), пока вы не получите сменный пульт дистанционного управления или универсальный пульт дистанционного управления.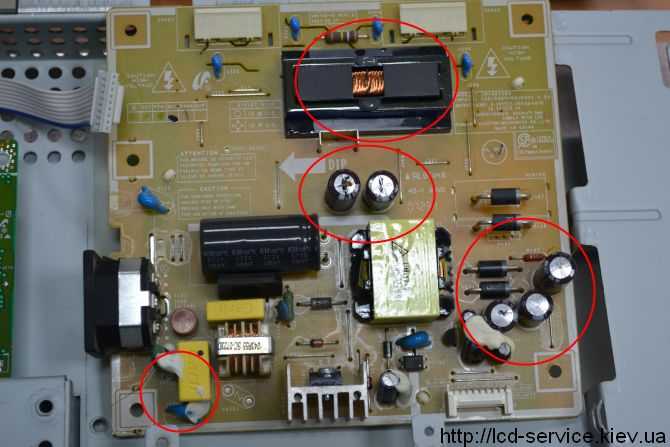
Был ли этот ответ полезен?
Да №
Оценка 4
Отменить
Джаефф @jayeff
Респ: 398.8k
9
324
1.4к
Опубликовано:
Опции
- Постоянная ссылка
- История
@kenn3737 ,
Попробуйте вынуть батарейки из пульта дистанционного управления и проверьте, остается ли телевизор включенным, когда вы уходите.
Мне интересно, если, стоя прямо перед телевизором, вы блокируете «ИК-окно», принимающее сигналы от пульта дистанционного управления.
Если это работает, у вас может быть залипшая кнопка на пульте или неисправный пульт
Был ли этот ответ полезен?
Да №
Оценка 1
Отменить
Джон @fixitdonttrash
Рем: 13
1
Опубликовано:
Опции
- Постоянная ссылка
- История
У меня была такая же проблема на телевизоре Samsung модели ln46b750u1fxza. Я осмотрел плату питания и заметил, что два конденсатора 10 В 1200 мкФ протекают и вздулись. Я заменил оба (приобретенных на newark.com) и, ВУАЛЯ!, проблема решена. Как всегда, убедитесь, что вы правильно разрядили любой потенциальный заряд, прежде чем прикасаться к какой-либо схеме.
Был ли этот ответ полезен?
Да №
Оценка 1
Отменить
Майкл Дейц @michaeld2
Реп: 877
10
4
Опубликовано:
Опции
- Постоянная ссылка
- История
Попробуйте удерживать Return и Play/Pause, а затем нажать Power. Я не знаю, что делать, если это не работает. Ищите красный сигнальный свет, если он есть.
Был ли этот ответ полезен?
Да №
Оценка 0
Отменить
З Чжан @zzhang
Рем.: 1
Опубликовано:
Опции
- Постоянная ссылка
- История
откройте крышку, отсоедините линию питания между материнской платой и блоком питания. ждать. и снова подключиться. это может сработать
Был ли этот ответ полезен?
Да №
Оценка 0
Отменить
Брэди Рунольфсдоттир @bradyrunolfsdot
Рем. : 1
Опубликовано:
Опции
- Постоянная ссылка
- История
Общее решение этой проблемы
- Проверьте красный индикатор режима ожидания и перезагрузите телевизор
- Проверьте батареи пульта дистанционного управления телевизора Samsung
- Проверьте подсветку телевизора
Есть самое распространенное решение, если эти задачи были выполнены полностью, то ознакомьтесь с этой статьей. Вот некоторые другие методы, которые могут помочь решить проблему. Надеюсь, это решит проблему. Ваше здоровье.
Был ли этот ответ полезен?
Да №
Оценка 0
Отмена
РЕШЕНО: Как я могу исправить, что мой Samsung PS43F4500 не включается – Samsung Television
570195
Руководства по ремонту и поддержке вашего телевизора Samsung.
2376 вопросов Посмотреть все
Тихая Шумба @syetronics
Рем: 23
1
Размещено:
Опции
- Постоянная ссылка
- История
- Подписаться
Мой Samsung ps43f4500 не включается при включении. Мигает только красный свет, а иногда красный свет исчезает, но на телевизоре ничего не отображается. И когда он включится, просто понаблюдайте несколько минут, затем изображение пропадет, но будет воспроизводиться звук
Ребята, вот моя текущая ситуация. Когда я проверил свои напряжения, я обнаружил, что все остальные напряжения в порядке, но напряжения Va и VS в норме только в течение нескольких секунд после того, как я включил телевизор (изображение на самом деле отображается в течение этих нескольких секунд иногда, но не всегда), затем напряжение начинает постепенно падать, пока не станет ниже 10 вольт.
Это нормально или нет, если нет, то как лучше vmcan устранить колебания напряжения Va, VS и что может быть причиной проблемы?
Ответил! Посмотреть ответ У меня тоже есть эта проблема
Хороший вопрос?
Да №
Оценка 1
Отмена
Выбранное решение
старая турция03 @oldturkey03
Респ: 729. 1k
1k
942
842
2,3к
Опубликовано:
Опции
- Постоянная ссылка
- История
@syetronics снимите заднюю панель с телевизора. Проверьте плату питания. Измерьте напряжение от платы питания до основной платы, посмотрите, есть ли у вас напряжения в режиме ожидания. Сравните напряжения со значениями, напечатанными на печатной плате, и сообщите нам, что получилось. Это может быть проблема с платой питания или основной платой, поэтому нам нужно получить от вас больше информации. Кроме того, разместите несколько хороших фотографий ваших досок с вашим вопросом. Так мы сможем увидеть то, что видите вы. Добавление изображений к существующему вопросу
Еще одна вещь, которую вы хотите попробовать перед разборкой, это проверить подсветку. Когда экран телевизора станет черным, посветите лучом фонарика под углом к экрану. Если вы можете разглядеть формы или силуэты, это означает, что у вас не работает подсветка. Дайте нам знать, что вы найдете.
Был ли этот ответ полезен?
Да №
Оценка 1
Отменить
Брин Трейнор @theandroidkid
Рем: 310
5
5
Опубликовано:
